.lsunda-article-wrap{color:#1e293b;font-family:inherit;line-height:1.72;max-width:100%;text-align:left!important}.lsunda-article-wrap *{box-sizing:border-box}.lsunda-article-wrap h2{color:#334155!important;font-family:inherit;font-weight:700;font-size:clamp(1.45rem,2.2vw,1.9rem);line-height:1.32;margin:2.55em 0 .75em;text-align:left!important}.lsunda-article-wrap h3{color:#334155!important;font-family:inherit;font-weight:700;font-size:clamp(1.12rem,1.7vw,1.35rem);line-height:1.38;margin:1.85em 0 .65em;text-align:left!important}.lsunda-article-wrap p{color:#1e293b!important;margin:0 0 1.05em;font-size:1rem;text-align:left!important}.lsunda-article-wrap a{color:#046bd2;text-decoration:none;font-weight:500}.lsunda-article-wrap a:hover{color:#045cb4;text-decoration:underline}.lsunda-list{margin:1.1em 0 1.9em;padding:0;list-style:none;display:grid;gap:.65em}.lsunda-list li{position:relative;padding:.78em 1em .78em 2.25em;border:1px solid #ECEFF3;border-radius:8px;background:#fff;text-align:left!important}.lsunda-list li::before{content:””;position:absolute;left:.95em;top:1.32em;width:.42em;height:.42em;border-radius:50%;background:#046bd2}.lsunda-imgrow{display:grid;grid-template-columns:repeat(2,minmax(0,1fr));gap:1.15em;margin:1.8em 0 2.1em;align-items:stretch}.lsunda-imgcol{min-width:0;overflow:hidden;border-radius:8px;background:#fff}.lsunda-figure{margin:0;overflow:hidden;border-radius:8px;background:#fff;height:100%}.lsunda-figure img,.lsunda-article-img{width:100%;aspect-ratio:1/1;height:100%;display:block;border-radius:8px;border:1px solid #ECEFF3;object-fit:cover;transition:transform .22s ease;transform-origin:center center}.lsunda-figure:hover img,.lsunda-article-img:hover{transform:scale(1.018)}.lsunda-tablewrap{width:100%;max-width:100%;overflow-x:auto;-webkit-overflow-scrolling:touch;margin:1.55em 0 2em;border:1px solid #D1D5DB;border-radius:8px;background:#fff}.lsunda-table{width:100%;min-width:860px;border-collapse:collapse;table-layout:auto;font-size:.95rem;color:#1e293b;background:#fff}.lsunda-table tr:first-child{background:#F0F5FA}.lsunda-table th,.lsunda-table td{text-align:left!important;padding:.85em 1em;border:1px solid #ECEFF3;vertical-align:top;line-height:1.55;overflow-wrap:anywhere}.lsunda-table th,.lsunda-table td:first-child{font-weight:700;color:#334155}.lsunda-table tr:not(:first-child):hover{background:#F9FAFB}.lsunda-faq{margin:1.15em 0 2.1em;border-top:1px solid #ECEFF3;text-align:left!important}.lsunda-faq-item{border-bottom:1px solid #ECEFF3;padding:0;margin:0;background:#fff}.lsunda-faq-q{cursor:pointer;list-style:none;color:#334155;font-weight:700;font-size:1.03rem;padding:1.05em 2.3em 1.05em .15em;position:relative;line-height:1.5;text-align:left!important}.lsunda-faq-q::-webkit-details-marker{display:none}.lsunda-faq-q::after{content:”+”;position:absolute;right:.35em;top:50%;transform:translateY(-50%);color:#046bd2;font-size:1.35rem;font-weight:500}.lsunda-faq-item[open] .lsunda-faq-q::after{content:”-“}.lsunda-faq-q:hover{color:#046bd2}.lsunda-faq-a{padding:0 .15em 1.15em;color:#1e293b;text-align:left!important}.lsunda-final-cta{margin:2.4em 0 2.2em;padding:1.45em 1.55em;border:1px solid #D1D5DB;border-left:4px solid #046bd2;border-radius:8px;background:#F9FAFB;text-align:left!important}.lsunda-final-cta h2{margin-top:0;text-align:left!important}.lsunda-cta-button{display:inline-flex;align-items:center;justify-content:center;min-height:44px;padding:.76em 1.15em;border-radius:4px;background:#046bd2;color:#fff!important;font-weight:700;line-height:1.2;text-decoration:none!important;transition:background-color .2s ease,transform .2s ease}.lsunda-cta-button:hover{background:#045cb4;color:#fff!important;transform:translateY(-1px)}.lsunda-pick{display:grid;grid-template-columns:minmax(220px,34%) minmax(0,1fr);gap:1.3em;align-items:start;margin:1.2em 0 2em}.lsunda-pick-media img{width:100%;aspect-ratio:1/1;height:auto;display:block;object-fit:cover;border:1px solid #ECEFF3;border-radius:8px}.lsunda-pick-copy h3{margin-top:0}@media(max-width:768px){.lsunda-article-wrap h2{margin-top:2.15em}.lsunda-imgrow{grid-template-columns:1fr;gap:1em}.lsunda-figure img,.lsunda-article-img{height:auto;aspect-ratio:auto;object-fit:contain}.lsunda-final-cta{padding:1.2em}.lsunda-pick{grid-template-columns:1fr}.lsunda-pick-media{max-width:520px}}@media(max-width:640px){.lsunda-table{min-width:760px;font-size:.9rem}.lsunda-table th,.lsunda-table td{padding:.7em .78em}}
One good wiring diagram answers ten forum threads. A USB car charger needs only three connections to work: a 12V power feed, a ground, and for data-capable modules the USB D+ and D- lines. Get those three right and fuse the feed at its source, and the install is straightforward. This reference covers the full diagram, what each wire does, and a 10-step install for a socket-type charger in 2026. Whether you want switched power that cuts off with the key or constant power for an always-on port, the wiring path is the same shape.
Quick answer: Run a fused 12V feed to the module’s positive lead, ground the negative to bare chassis metal, and size the wire and fuse to the module’s current draw. Data lines only matter if the port carries data, not just charge.
The Basic Wiring Diagram
Here is the whole circuit in one view. Power flows from the battery, through a fuse, through an optional ignition switch, into the module, and back to ground.
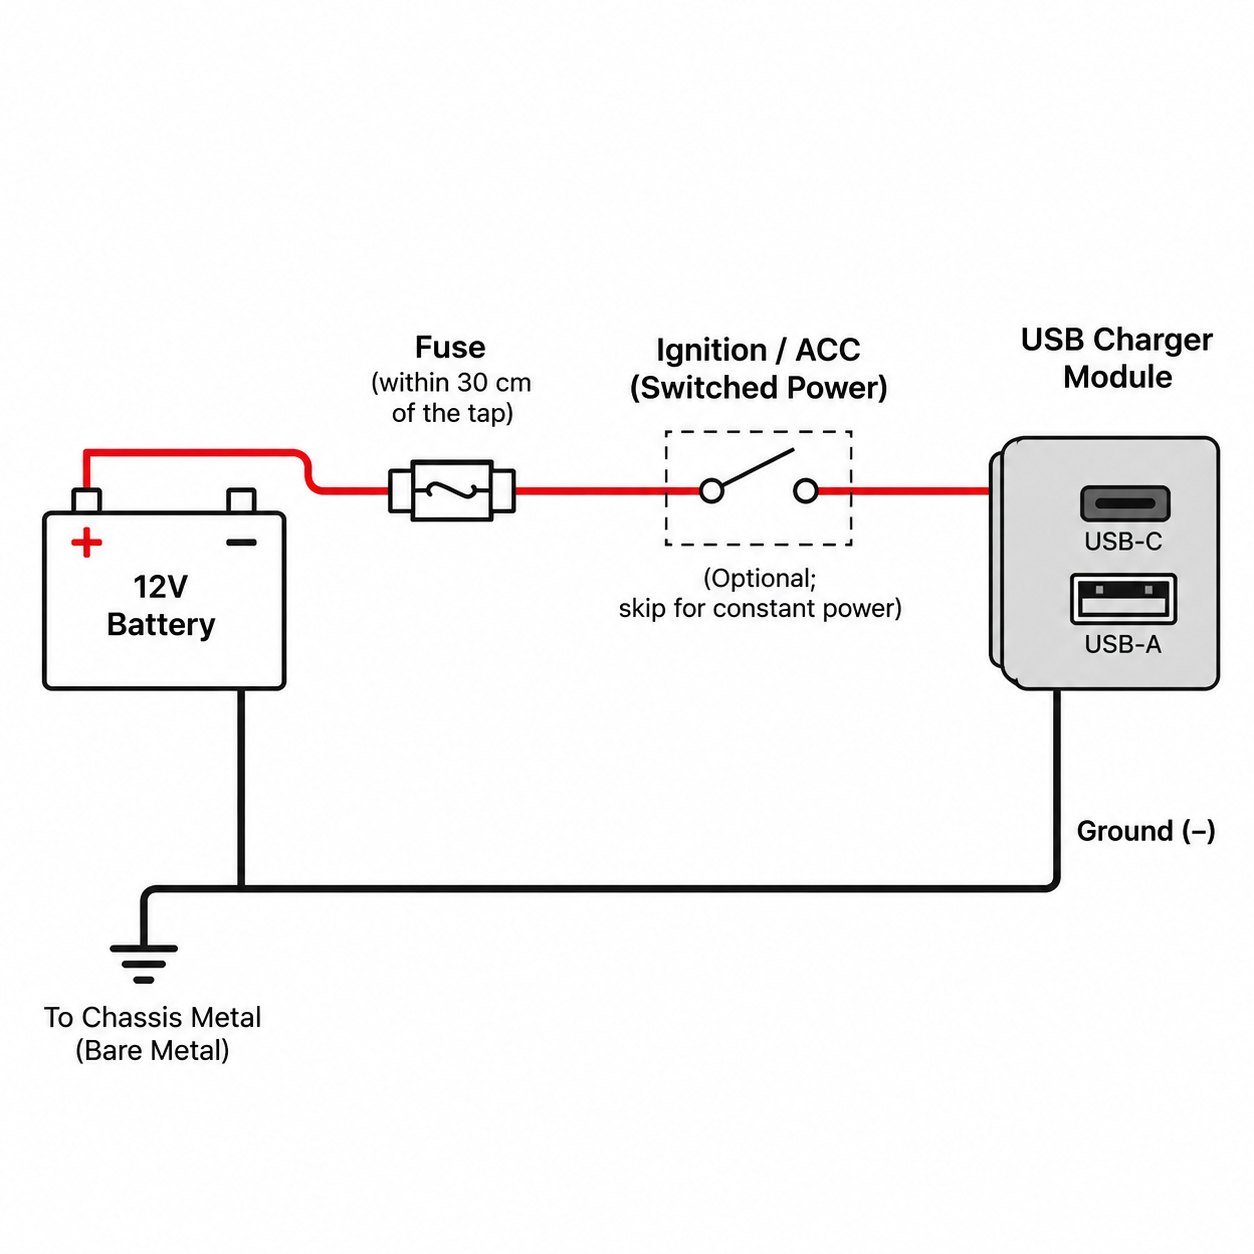
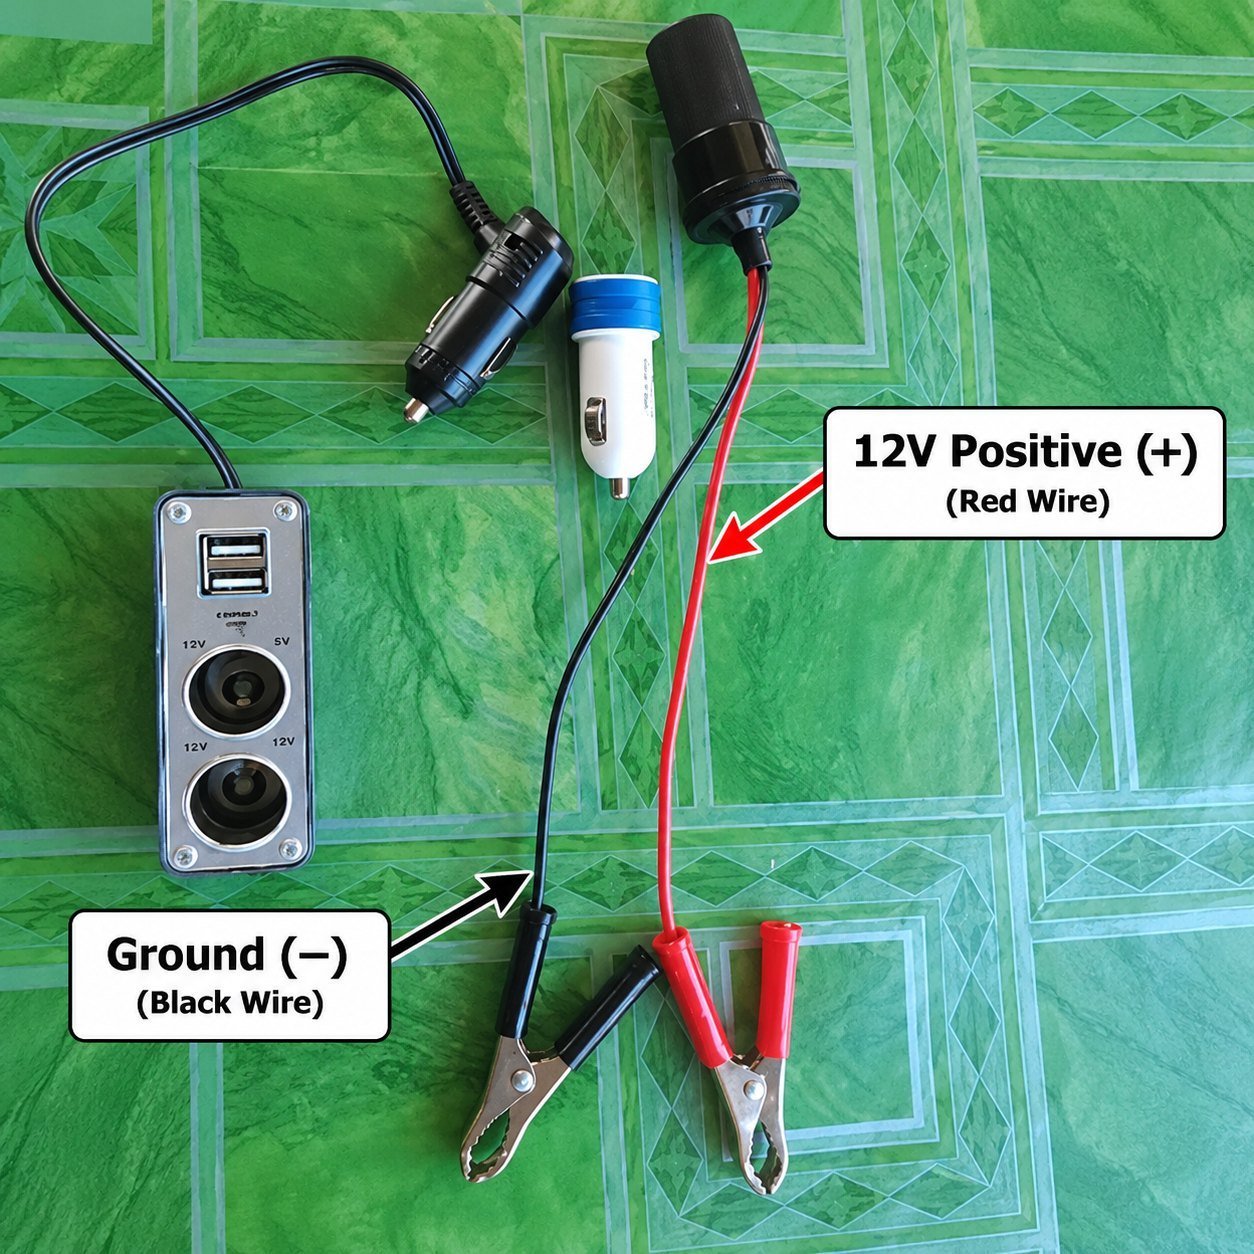
The fuse always sits close to the power source, not near the module. That way a short anywhere along the wire blows the fuse before the wire can overheat. Switched power taps an ignition-controlled circuit so the ports die with the key. Constant power skips that step and wires straight to a battery-fed source.
What Each Wire Does
A USB car charger has two power wires and, on data-capable units, two or four signal wires. Each has one job.
- Positive 12V feed. The red wire. It carries battery voltage into the module. This is the line that must be fused.
- Ground. The black wire. It completes the circuit back to the battery negative, usually through the car’s chassis. A poor ground causes voltage drop and noise.
- D+ and D- (data lines). On a USB-A port, these two lines carry both data and the signaling that tells a phone how much current it can pull. A charge-only module leaves them out, which is fine for charging but blocks data features like Android Auto. The same logic applies on the cable: a charge-only USB-C cable without data lines blocks the negotiation even on a fully wired module. A full-data USB-C cable keeps that path open.
- CC pin (USB-C). The configuration channel. It negotiates PD voltage and current. Without a working CC line, a USB-C port falls back to 5V and never fast-charges. This is why a quality module matters more than the wiring alone. SUNDA’s car charger modules carry the full CC and data circuitry so the port negotiates correctly once power reaches it.
Socket-Type Install, Step by Step
This sequence wires a socket-type or bare-lead USB module to a power source. Size your wire and fuse first, using the table below.
| Module current | Wire gauge | Fuse rating |
|---|---|---|
| Up to 3A (15W) | 20 AWG | 5A |
| Up to 5A (60W) | 18 AWG | 7.5A |
| Up to 8A (100W) | 16 AWG | 10A |
| Up to 10A (120W) | 14 AWG | 15A |
The fuse protects the wire, so it sits above the module’s draw but inside the gauge’s safe limit.
- Disconnect the battery negative. First step, every time.
- Choose the power source. An add-a-circuit fuse tap for switched power, or a battery-fed source for constant power.
- Pick wire and fuse from the table for your module’s rated current.
- Mount the module where you want the ports.
- Run the positive feed from the source to the module, with the fuse within 30 cm of the tap.
- Crimp every connection. No bare twists, no electrical tape splices.
- Ground the negative to a clean chassis bolt. Scrape off paint for bare metal contact.
- Route the wires away from pedals, heat sources, and any airbag deployment zone.
- Reconnect the battery and test. Check the port output with a meter or a phone.
- Secure the run with split loom and tidy any slack.
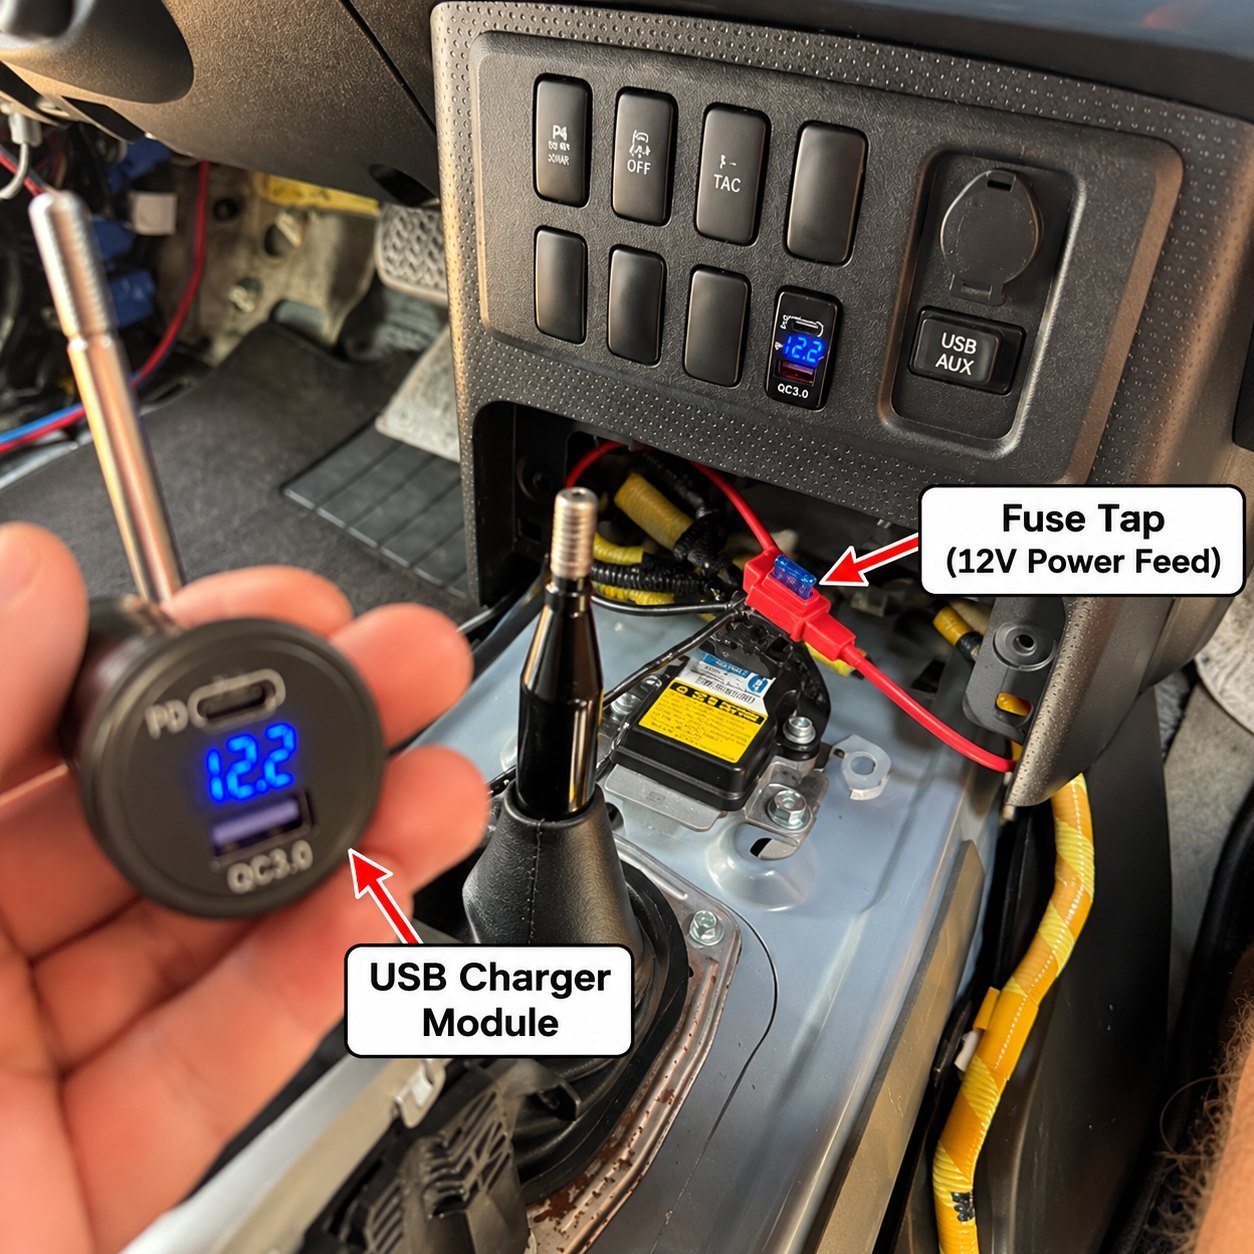
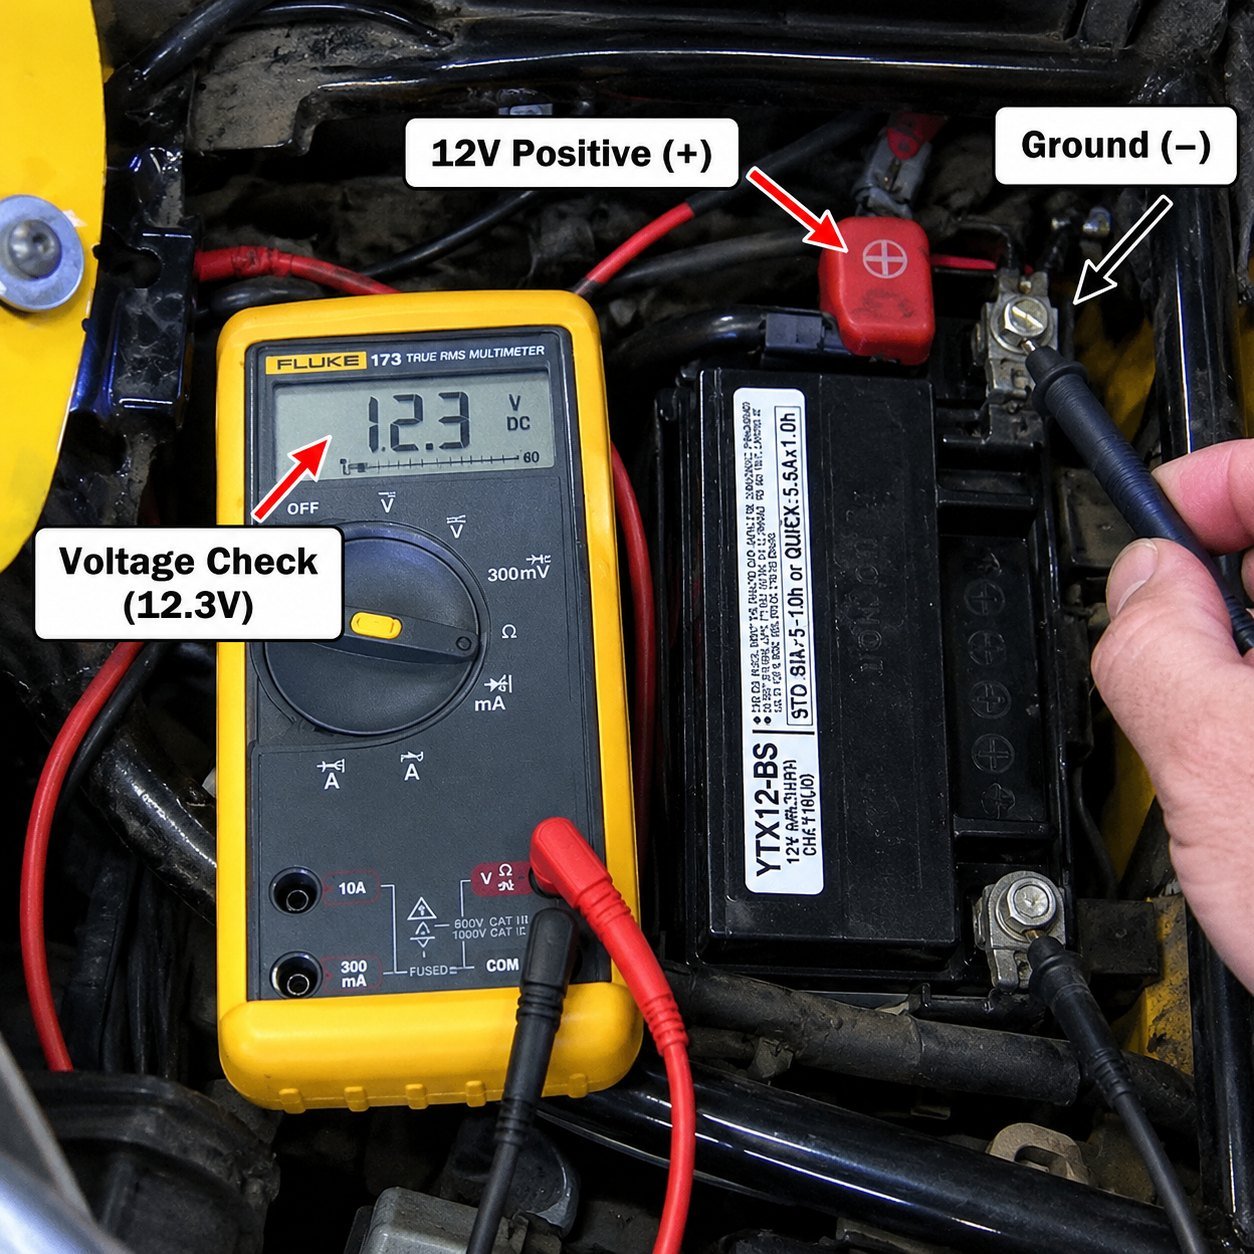
The Flush-Mount Variant
A flush-mount module follows the same wiring, with one difference at the front end. Instead of a socket body, the module seats in a cut-out in the dash, console, or an unused blank panel. The power, ground, and data connections behind the trim are identical to the socket-type install above.
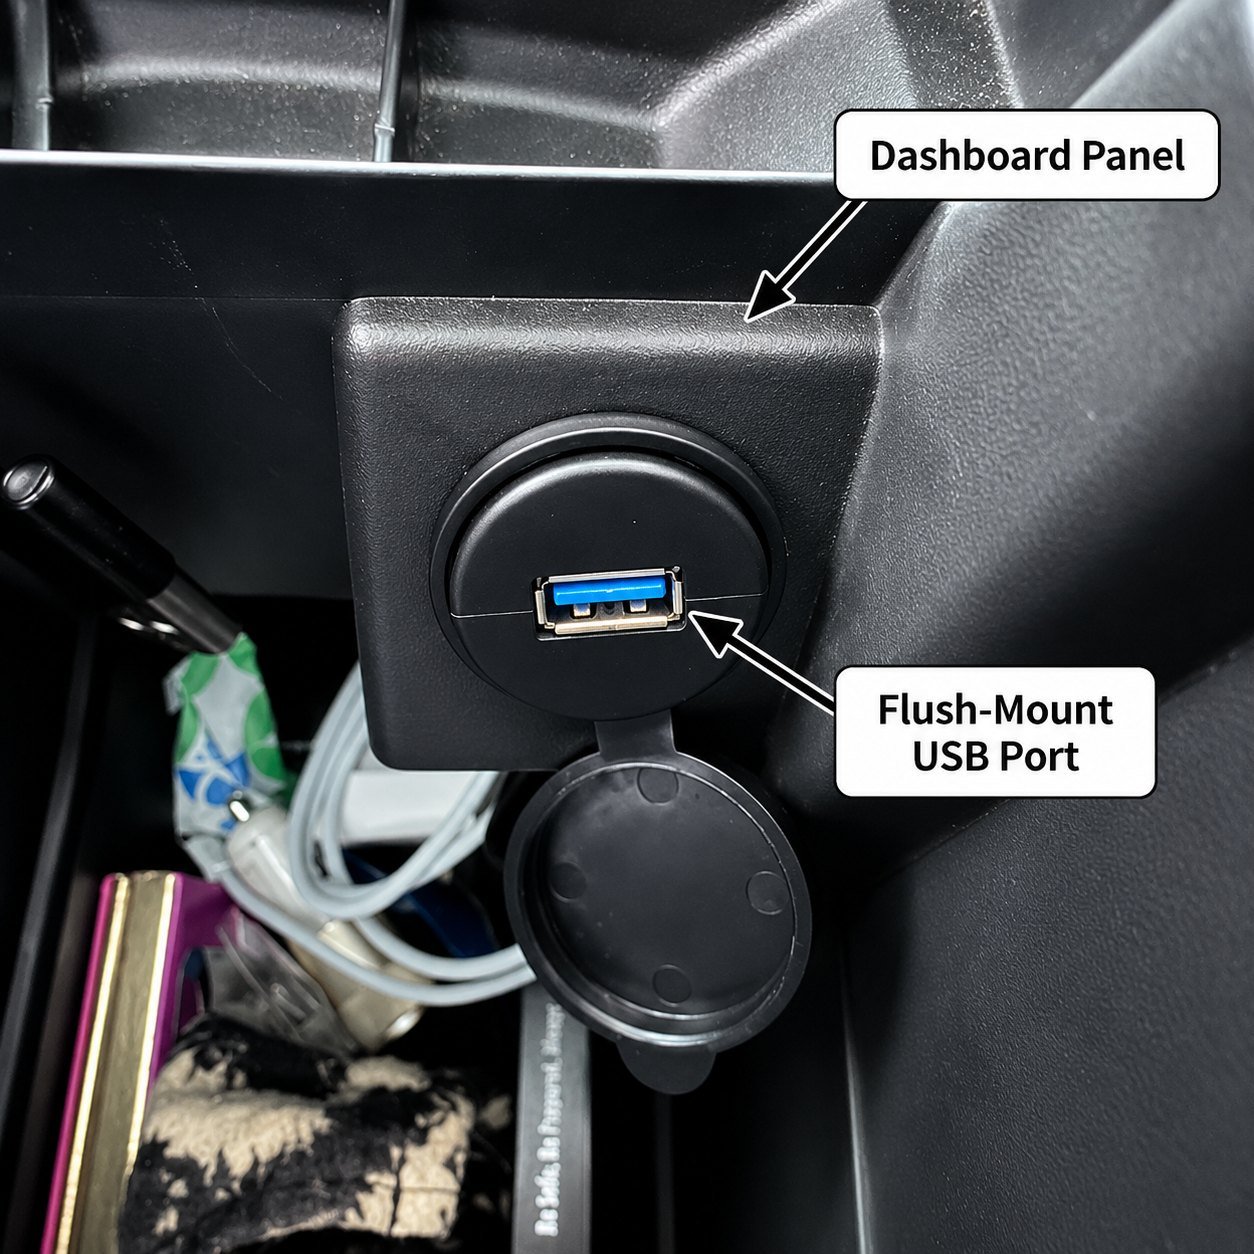
The extra work is purely mechanical. You measure and cut or adapt the opening, feed the leads through, and clip or screw the bezel in place. The wiring table and the fuse rule do not change. A full walkthrough of panel selection and cutting for flush-mount installs covers the mounting side in depth.
Wiring Mistakes That Cause Real Damage
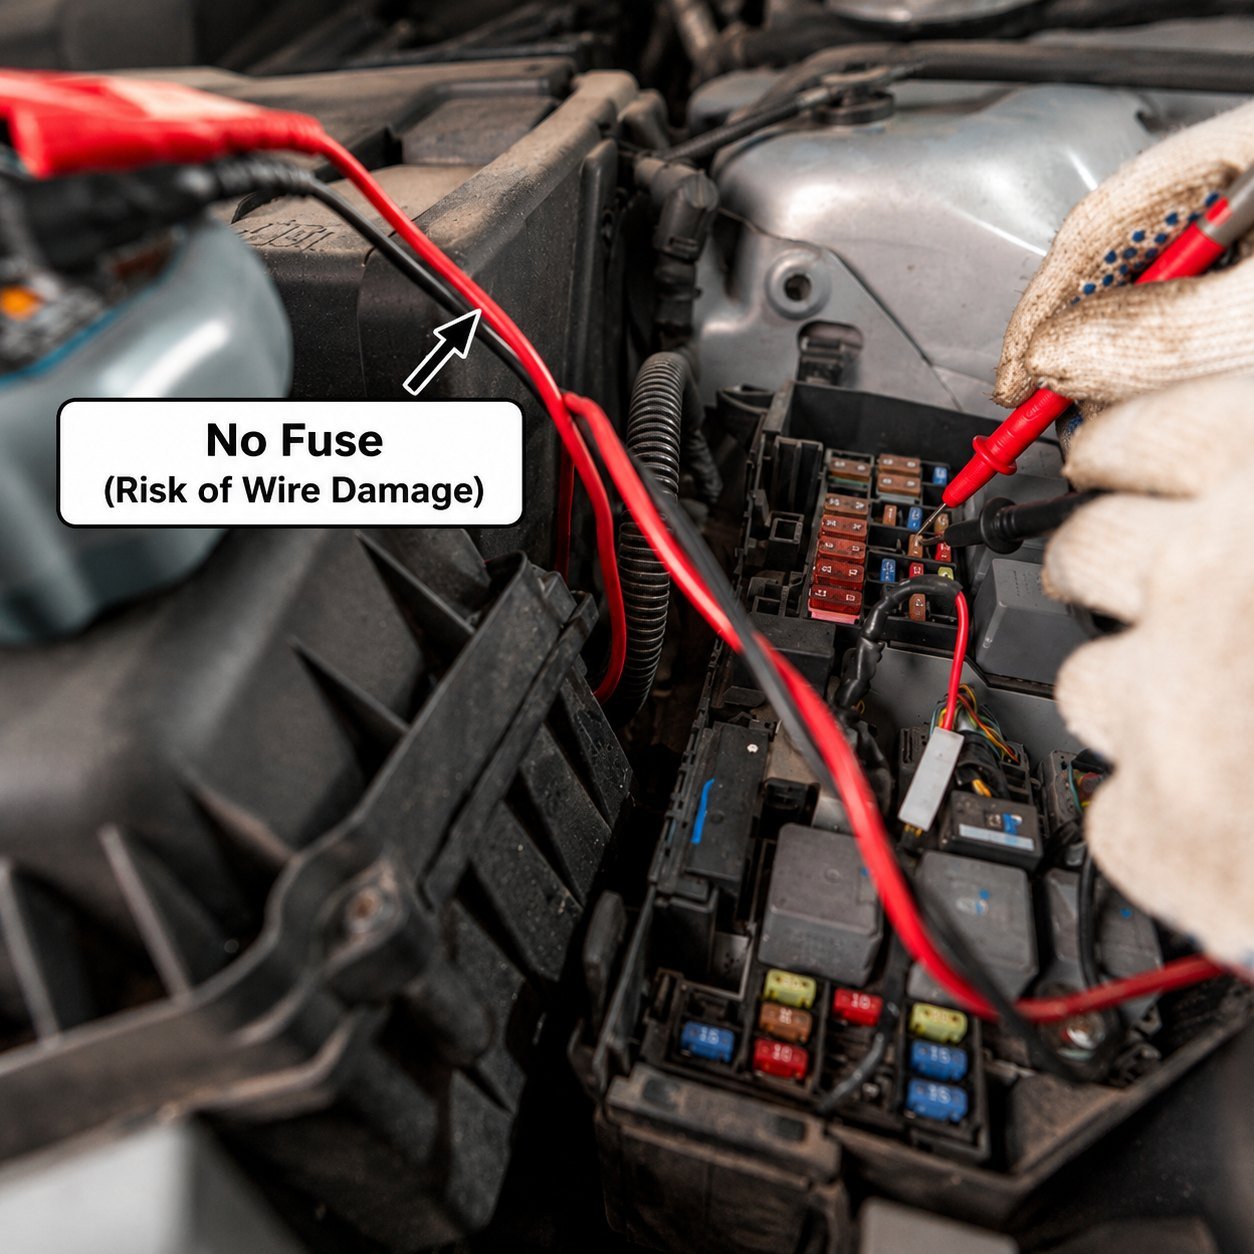
Most install failures trace to one of four mistakes. Each has a clear cause and a clear fix.
- No fuse, or a fuse too far from the source. A short then has nothing to stop it, and the wire itself becomes the fuse. Always fuse within 30 cm of the tap.
- Sharing a ground with the audio system. This creates a ground loop that puts a whine through the speakers. Ground the charger to its own clean chassis point.
- Reversed polarity. Swap positive and ground and you can destroy the module the instant you reconnect the battery. Check wire colors twice.
- Undersized wire. Running a 5A module on 22 AWG bell wire causes voltage drop, heat, and reduced output. An old 1A USB module on thin wire is fine until someone swaps a high-output unit onto the same run. Match the gauge to the new load, not the old one.
Pre-Install Checklist
Run through this before you reconnect the battery.
- Fuse fitted within 30 cm of the power tap, rated to the wire gauge
- Wire gauge matched to the module’s current from the table above
- Ground bolted to bare chassis metal, not paint or a loose bracket
- All connections crimped, none twisted or taped
- Wires routed clear of pedals, heat, and airbag zones
- Polarity checked twice before power-on
For workshops and fleet upfitters wiring the same module across many vehicles, SUNDA supplies the CC53 car charger series with bare-lead or custom-length harnesses and per-run wiring notes. Request wiring schematics and a quote for your vehicle models and the team will respond within two business days.
Summary
A USB car charger install comes down to three wires and one rule. Feed fused 12V to the positive, ground the negative to clean metal, and carry the data lines only if the port needs them. Size the wire and fuse to the module’s current, keep the fuse close to the source, and check polarity before power-on. The diagram above is the same for socket-type and flush-mount units. Only the mounting changes.
Request Wiring Schematics
Send your vehicle models and module configuration for per-model wiring schematics, harness drawings, and a quote within two business days.
FAQ
What wires do I need for a USB car charger?
You need two power wires at minimum: a positive 12V feed and a ground. The positive must be fused close to its source. Data-capable modules add D+ and D- lines on USB-A ports or a CC line on USB-C, but a charge-only module uses just the two power wires.
Do I need a relay for a hardwired USB charger?
No, not for a typical USB module. A relay is only needed when switching a high-current load or when you want a constant-power source to behave as switched. A standard USB charger wires directly to a switched fuse slot through an add-a-circuit tap, which handles the on-off behavior without a relay.
What fuse rating for a USB charger circuit?
Match the fuse to the wire gauge, not the device. A 3A module on 20 AWG wire takes a 5A fuse. A 5A module on 18 AWG takes 7.5A. The fuse must sit above the module’s normal draw but inside the wire’s safe current limit, so it protects the wire from a short.
Can I wire a USB charger to the battery directly?
Yes, for constant power, but with two conditions. Fuse the positive lead within 30 cm of the battery terminal, and only do this if you want the ports live at all times, such as for a dash cam. For phone charging, a switched source is safer because it cuts off with the key and cannot drain the battery.
Why does my installed USB charger make speaker noise?
That whine is almost always a ground loop. The charger and the audio system share a ground path, and alternator noise rides onto the audio ground. Move the charger’s ground to its own clean chassis point away from the head unit, or choose a module with built-in noise filtering.
Where can I get wiring diagrams for fleet installs?
SUNDA provides per-model wiring schematics and custom harness specifications to installers and fleet buyers. For a specific vehicle model or a custom module configuration, request the diagram and harness drawing directly from the engineering team along with your volume requirement.